
There are many ways that people do to develop their Wordpress plugins, the main one is installing a local dev server, have all your plugins inside this WordPress site and open it in your editor.
For me, this is always seems wrong, I like to keep the plugin outside the WordPress installation, this way I don't care if I want to delete it, nor that I'll have a long path (yes I feel annoyed when seeing the full path in my PHPStorm project).
The simplest and best workflow for me that I liked was installing WordPress using bedrock, having the plugin code in my code/development directory and combine those with Laravel Herd.
You may not like this approach and this is so normal, all you need to do is to figure out the best solution that make you more comfortable and productive, any tool any approach or any freaking way that works for you is fine.
Back to my way, this works so nice, for me for the past three years while working at Extendify, but I wanted to change things a bit, so after some research I found my nice spot, adding worktrunk to my belt.
Note: I always jump between Zed and PHPStrom, as my editors, the main one I use is PHPStorm, but Zed seems to provide a some nice spot for me that I keep go back and forth between the two, while this is not about my editor of choice, I think you will be find using what ever you like.
Worktrunk is a git worktree manager, while this post is not to teach or explain how worktree or worktrunk works, it is nice if you have some background about those two.
I am on mac so keep that in mind while reading or trying to execute the commands. If you are not on mac you will need to figure out the alternative commands that will work for your operating system, although I think if you are on Linux it will work the same. So now that I have explained what tools I'll be using, lets go into some details.
Installing Herd: you can go to the site and download the free version (or even better buy the pro version if you want to use their pro feature). There is not much I can talk about here as this is a normal setup process.
Creating your WordPress site: Bedrock depends on composer to create the WordPress site, now that you have Herd installed (or you already using something else) you can run a simple composer command to create a WordPress site, keep in mind that this will create the site but not install it!!!
composer create-project roots/bedrock my-wordpress-site
Depending on what you prefer, you can name your site as you like, for me, I use wordpress 🤷♂️ .
Once its done, you will need to create a new .env file and have the following data inside of it.
DB_NAME='wordpress'
DB_USER='root'
DB_PASSWORD=''
DB_HOST=127.0.0.1
DB_PORT=3306

WP_ENV='development'
WP_HOME='https://wordpress.test'
WP_SITEURL="${WP_HOME}/wp"

# Specify optional debug.log path
# WP_DEBUG_LOG='/path/to/debug.log'
# Generate your keys here: https://roots.io/salts.html
AUTH_KEY=
SECURE_AUTH_KEY=
LOGGED_IN_KEY=
NONCE_KEY=
AUTH_SALT=
SECURE_AUTH_SALT=
LOGGED_IN_SALT=
NONCE_SALT=
While this is a local development site, it does not mean you don't need to generate the salts for it, so don't forget this step.
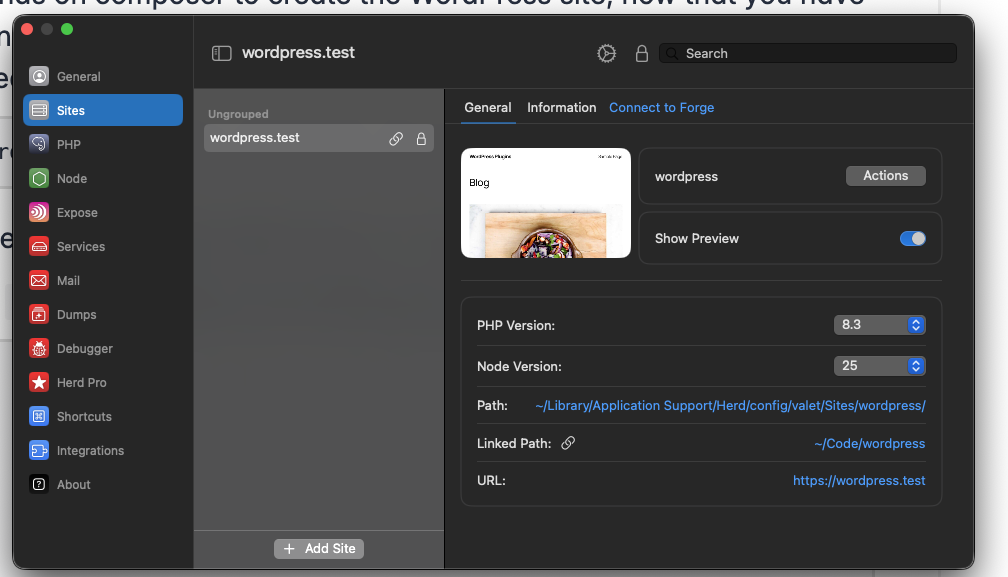
You will notice that I am using https://wordpress.test as the website url (home) and this is because I use Herd and its default .test tld, so name it as you like.
Here is how my site looks in Herd
Once you created your site, you will have two options, either to go to the browser and do your normal installation process, or use an automation script like me (call it install.sh and remember to make it executable)
#!/usr/bin/env sh
# Default language is English (en_US) if not specified
LANGUAGE=${1:-en_US}
set -e
# Detect if we're on macOS or Linux to use the appropriate echo command
if [ "$(uname)" = "Darwin" ]; then
  # For macOS, define a function that mimics echo -e
  echo_with_color() {
    printf "%b\n" "$1"
  }
else
  # For Linux systems
  echo_with_color() {
    echo -e "$1"
  }
fi
# Colors for better readability
GREEN='\033[0;32m'
BLUE='\033[0;34m'
YELLOW='\033[0;33m'
NC='\033[0m' # No Color
# Function to execute commands with timestamp and display
execute_command() {
  local cmd="$1"
  local description="$2"
  echo_with_color "${BLUE}[$(date '+%Y-%m-%d %H:%M:%S')]${NC} ${YELLOW}$description${NC}"
  echo_with_color "${GREEN}>> $cmd${NC}"
  eval "$cmd"
  echo ""
}
# Step 1: Clean up old plugins and files
execute_command "rm -rf ./web/app/plugins/*" "Remove all plugins to ensure clean Composer installation"
execute_command "rm -fr ./web/app/{uploads,upgrade,upgrade-temp-backup,*.log,*.php}" "Remove old app files"
# Step 2: Reset database
execute_command "wp db reset --yes" "Reset database"
# Step 3: Install dependencies via Composer
execute_command "composer install --no-dev --optimize-autoloader" "Install Composer dependencies (plugins, themes, etc.)"
# Step 4: Install WordPress core with specified language
execute_command "wp core install --admin_user=admin --admin_password=admin --admin_email=admin@example.com --skip-email --url=https://wordpress.test --title=\"WordPress Plugins\" --locale=$LANGUAGE" "Install core WordPress (language: $LANGUAGE)"
# Step 5: Set up WordPress configuration
execute_command "wp rewrite structure '/%postname%/'" "Set permalink structure"
# Step 6: Symlink development plugins from ~/Code/wp-plugins
echo_with_color "${BLUE}[$(date '+%Y-%m-%d %H:%M:%S')]${NC} ${YELLOW}Symlinking development plugins${NC}"
find ~/Code/wp-plugins -mindepth 1 -maxdepth 1 -type d | while read -r plugin_dir; do
  plugin_name=$(basename "$plugin_dir")
  echo_with_color "${GREEN}>> Symlinking $plugin_name from $plugin_dir to ./web/app/plugins/$plugin_name${NC}"
  ln -sf "$plugin_dir" "./web/app/plugins/$plugin_name"
done
echo ""
# Step 7: Install and activate utility plugins
execute_command "wp plugin activate ai ai-provider-for-openrouter query-monitor wp-crontrol" "Activate plugins installed via Composer"
# Step 8: Clean up
execute_command "rm -fr ./web/app/debug.log" "Delete debug log"
echo_with_color "${GREEN}Installation completed successfully!${NC}"
echo_with_color "${BLUE}Utility plugins are managed via Composer. Development plugins are symlinked from ~/Code/wp-plugins/.${NC}"
You will need to modify this script to fit your requirements, but let me explain what does it do, and yes I use AI to generate it 😅.
- It will delete all the plugins from the plugins folder.
- It will delete the non-needed directories like the upload, upgrades ... etc.
- It will reset the database. As I always like to start with a fresh database installation.
- Uses wp cli to install WordPress automatically and set the username/password to admin/admin. DO NOT DO THAT IN PRODUCTION, the username and password should not be that simple.
- Setting up the permalink.
- Symlink my plugins to the WordPress plugins directory, the plugins I work with are resides in
~/Code/wp-pluginsso the script will get all the top directories in there and then symlink them in the plugins directory. - Finally install and activate some of the plugins I like to have.
Till now, nothing I mentioned has anything to do with worktrunk or worktree, and this is the nice part, so let me explain what I did and why I think its nice.
First of all, what is git worktree, from DuckDuckGo search assistant
Git worktree is a feature that allows you to manage multiple working trees attached to the same Git repository, enabling you to check out different branches simultaneously in separate directories. This helps you work on multiple features or fixes without needing to switch branches or stash changes.
So basically, you will be able to create and switch to another branch without stashing the modified files, which may seems nice, but you may wonder where the new worktree will be created? usually, it will be inside the same project within a directory called .worktree .
For me personally I dont like that location at all, as it will mess up with my editors, like indexing or even false positive duplications notice (I am looking at you PHPStorm), so I found out that having a separate location is much more better.
I create a directory within my Code directory and I call it worktree and the main purpose for this is to hold and keep any worktree I work on.
So your Code directory should be something like this
~/Code
├── wordpress <-- WordPress installation
├── worktree
└── wp-plugins <-- your WordPress plugins
This is all seems nice, but still no value yet, so lets create a plugin called my-awesome-plugin inside wp-plugins directory, this plugin will not have any code other than a simple index.php file and we will need to initiate a git working tree in it, something like:
cd wp-plugins
mkdir my-awesome-plugin
cd my-awesome-plugin
echo "my first plugin" > index.php
git init
git add .
git commit -m "first commit"
For sure this is not a valid WordPress plugin file, so lets fix this, open the index file and update it with the following
<?php
/**
 * Plugin Name: My Awesome Plugin
 * Plugin URI: https://yourwebsite.com/plugin
 * Description: A brief description of your plugin
 * Version: 1.0.0
 */
Save the file, and now the test to check if everything is working:
- Go into your WordPress installation folder and run ./install.sh (this is the name of the automated script I shared above).
- Login to your wordpress and head to plugins and you should see the new plugin there

So now we have everything up and running, any new plugin you create in wp-plugins directory will appear automatically in your Wordpress installation after reseting your installation.
To work with git worktree, I chose worktrunk as I mentioned above, so go to the site and make sure it is already installed in your system then follow along here:
Configuring Worktrunk globally: First we need to create a global config directory for worktrunk, and we can do that by running the following command
wt config create
This will create a config file config.toml inside ~/.config/worktrunk directory, what we will do is simple, we will open the file in our favorite editor and delete everything inside of it and add the following:
worktree-path = "~/Code/worktree/{{ repo }}/{{ branch | sanitize }}"

[pre-start]
copy-ignored = "wt step copy-ignored"
Save the file and exit, what this will do is telling worktrunk that the default path for our worktree is not the default one, but the one we create, and it will be within the repo name, so for example, when we create a new worktree for our awesome plugin the path will be ~/Code/worktree/my-awesome-plugin/new-awesome-feature and the second line will ask it to copy the git ignored files that we specify in a file called .worktreeinclude .
This file .worktreeinclude can be either part of your repo or can be part of the global config folder, for me I chose to have it part of the global config folder since I git ignore the repo worktrunk config folder (globally), so lets create this file inside ~/.config/worktrunk and add the following to it
.config/
.zed/
vendor/
node_modules/
So now whenever I create a new worktree using worktrunk, these directories will also copied over to my new worktree, you can add any folders you use for example if you use specific things for vscode inside .vscode directory you can add it there too.
Some will argue that there is no need to copy vendor and node_modules directories, but I think these will speed things up, so feel free to change it based on what you want.
Configuring Worktrunk locally: Now that we have worktrunk configured globally we can configure it locally by running the following command which will create the wt.toml file inside your project in a directory called .config , if you are working alone you can keep this folder as part of your code, or you can just add it to your .gitignore file.
wt config create --project
Open the file in your preferred editor and delete everything within in and add the following
[post-switch]
update-symlink = "ln -sfn {{ worktree_path }} ~/Code/wordpress/web/app/plugins/{{ repo }}"

[post-remove]
restore-symlink = "ln -sfn {{ primary_worktree_path }} ~/Code/wordpress/web/app/plugins/{{ repo }}"- Post switch: will symlink the new repo to your WordPress plugins directory, and it will run on every switch, this way switching back and forth between your worktrees will keep the symlink accurate
- Post remove: will run after you remove (delete) the worktree so it will make sure the symlink is accurate.
While these seems simple, they make works much more easier, as you will not need to maintain multiple WordPress installation for each branch.
These are just a small set of hooks that you can run with worktrunk, so I urge you to look into them here and read more about them and how to use them.
So now what, how can I create a new worktree or switch to it? this is as simple as these two commands:
wt switch <branch-name> --create // to create a new branch and cd to it
wt switch <branch-name> // to switch to the new branch and cd to it
Here is a full example from my machine:
my-awesome-plugin [main][!][🐘 v8.5.5]
➜ wt switch test --create
◎ Running pre-start user:copy-ignored
  wt step copy-ignored
✓ Copied 1 file · 220 B
✓ Created branch test from main and worktree @ ~/Code/worktree/my-awesome-plugin/test
◎ Running post-switch: update-symlink (project)
test [test][🐘 v8.5.5]
➜ wt switch main
○ Switched to worktree for main @ ~/Code/wp-plugins/my-awesome-plugin
◎ Running post-switch: update-symlink (project)
my-awesome-plugin [main][!][🐘 v8.5.5]
➜ wt switch test
○ Switched to worktree for test @ ~/Code/worktree/my-awesome-plugin/test
◎ Running post-switch: update-symlink (project)
test [test][🐘 v8.5.5]
➜ wt remove test
◎ Removing test worktree & branch in background (same commit as main, _)
○ Switched to worktree for main @ ~/Code/wp-plugins/my-awesome-plugin
◎ Running post-remove: restore-symlink (project); post-switch: update-symlink (project)
my-awesome-plugin [main][!][🐘 v8.5.5]
You can notice that my main branch has an unstashed files, and this didn't cause any issue when creating the new test worktree and the new location for it is ~/Code/worktree/my-awesome-plugin/test so how does my WordPress plugins directory looks like
web/app/plugins
➜ ls -al
total 0
drwxr-xr-x@ 12 zaher  staff  384 May  5 11:26 .
drwxr-xr-x@  9 zaher  staff  288 May  5 10:59 ..
drwxr-xr-x@  9 zaher  staff  288 May  5 10:59 ai
drwxr-xr-x@  7 zaher  staff  224 Mar 23 17:13 ai-provider-for-openrouter
drwxr-xr-x@ 19 zaher  staff  608 Mar  9 05:54 fakerpress
drwxr-xr-x@ 10 zaher  staff  320 Apr 14 15:12 mcp-adapter
drwxr-xr-x@ 12 zaher  staff  384 Apr 24 16:25 millicache
lrwxr-xr-x   1 zaher  staff   49 May  5 11:26 my-awesome-plugin -> /Users/zaher/Code/worktree/my-awesome-plugin/test
drwxr-xr-x@ 15 zaher  staff  480 Apr 11 14:49 query-monitor
drwxr-xr-x@ 11 zaher  staff  352 Jan 29 00:13 wp-crontrol

web/app/plugins
➜ ls -al
total 0
drwxr-xr-x@ 12 zaher  staff  384 May  5 11:26 .
drwxr-xr-x@  9 zaher  staff  288 May  5 10:59 ..
drwxr-xr-x@  9 zaher  staff  288 May  5 10:59 ai
drwxr-xr-x@  7 zaher  staff  224 Mar 23 17:13 ai-provider-for-openrouter
drwxr-xr-x@ 19 zaher  staff  608 Mar  9 05:54 fakerpress
drwxr-xr-x@ 10 zaher  staff  320 Apr 14 15:12 mcp-adapter
drwxr-xr-x@ 12 zaher  staff  384 Apr 24 16:25 millicache
lrwxr-xr-x   1 zaher  staff   46 May  5 11:26 my-awesome-plugin -> /Users/zaher/Code/wp-plugins/my-awesome-plugin
drwxr-xr-x@ 15 zaher  staff  480 Apr 11 14:49 query-monitor
drwxr-xr-x@ 11 zaher  staff  352 Jan 29 00:13 wp-crontrol
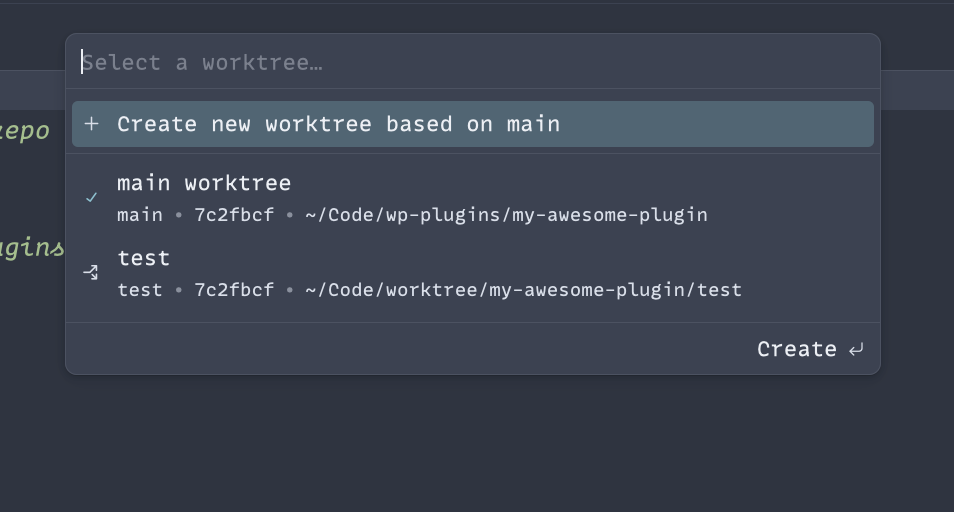
How your IDE deals with worktree is out of the scope of this post, but I can show you in Zed.dev that this is how you can switch between the new worktrees
Thats it, its long but seems worth it, and I hope you have learned something new today.